Table of Contents
Maintenance
3D printing is still a technology that relies heavily on trial and error. It's nearly impossible to master the technology without getting your hands dirty. As there are no globally recognized standards in the 3D printer, material, or software manufacturing, it is vulnerable to a variety of printing problems. A multitude of 3D printer issues results in failed prints, which leads to a loss of business, if not your interest in the technology.
To make sure you don’t feel bogged down by the problems and abandon this revolutionary technology, we list down the most popular 3D printer problems and ways to troubleshoot them.
How to maintain it if not used for a long time
① Filament
After printing is completed, please exit the remaining filaments from the printer and seal them for storage. 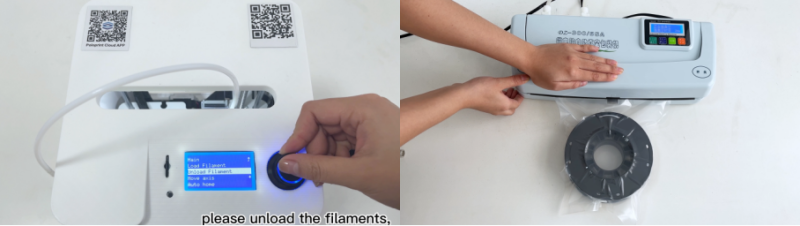
② Lead screw
When the printer is in use, the X and Y directions rely on precision guide rails and Z-axis screw rods to ensure smooth and precise linear motion. After adding lubrication silicone grease, it can reduce friction and reduce the wear of mechanical moving parts, so it must be maintained regularly. It is recommended that maintenance be performed after 1,000 hours of use. Take out the lubricating silicone grease from the random accessory box and apply it evenly on the screw rod.
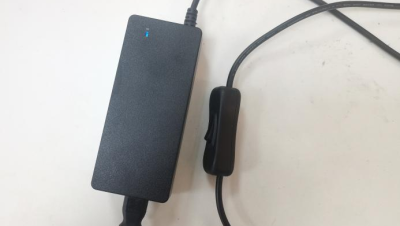
③ Power supply
If not used for a long time, please turn off the power. Keep the place of use clean and dry. Prevent dust accumulation at the power input and output ports. The power supply should be protected from rainwater and direct sunlight. Put on the bag.
Clogged
If the filament does not come out, or the extruder makes a “click” sound, or the model prints poorly, it is blocked. During the 3D printing process, some debris and dust particles in the filaments may accumulate around the printing nozzle. Over time, these build-ups can lead to poor printing accuracy or clogged nozzles.
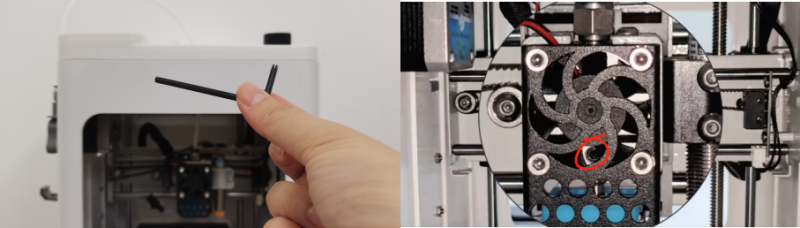
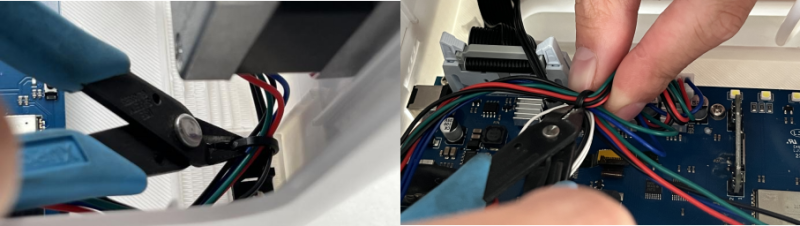
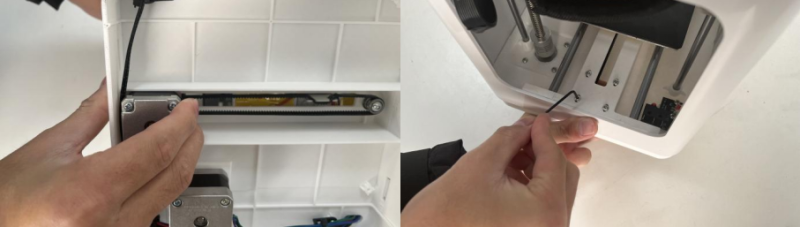
① Fan
Please check if the fan is working properly while printing. If the fan does not rotate, it will cause the nozzle to become clogged.
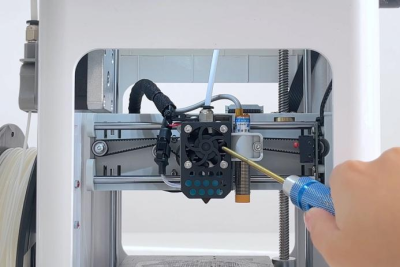
If the fan fails, replace the fan:
1. Use a 2.5mmL wrench to loosen the 4 screws.
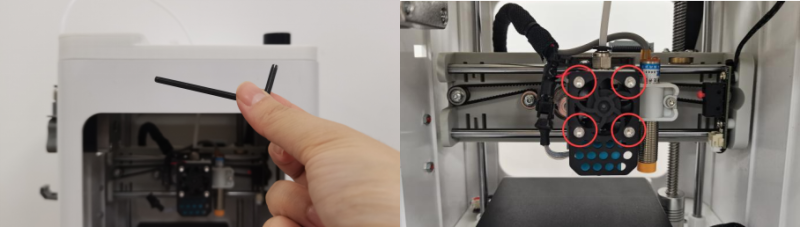
2. Cut off the ties and untie the black wrapping cloth.
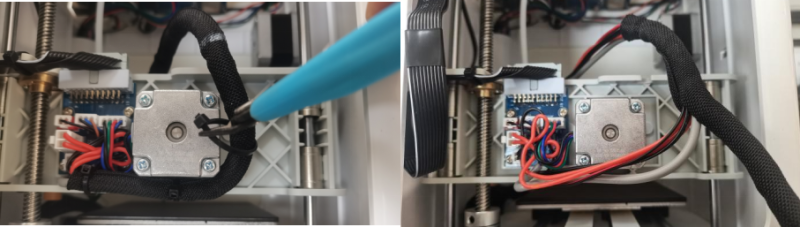
3. Unplug the fan, untie the tape, and remove the fan. 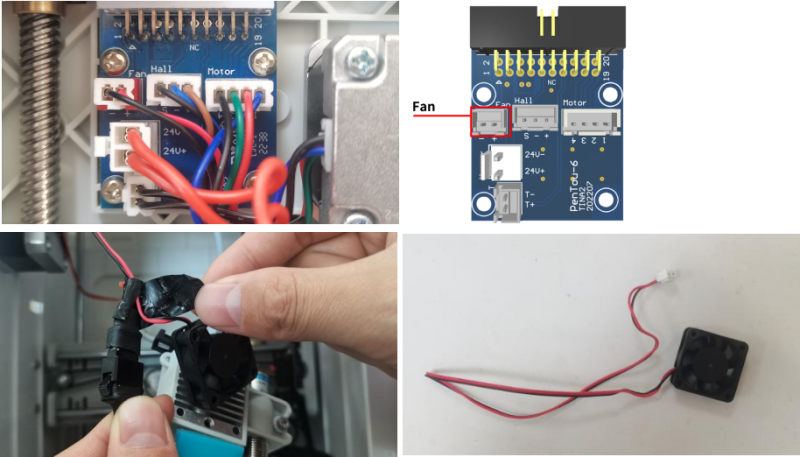
4. Replace and install a new fan, making sure the fan label is facing inward.
② Filament
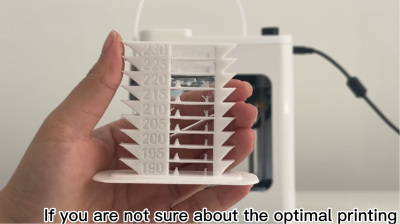
The printing temperature of the filament is low, the quality is poor, the filament becomes brittle due to moisture, or is dusty, or becomes entangled during printing, which will lead to clogging.
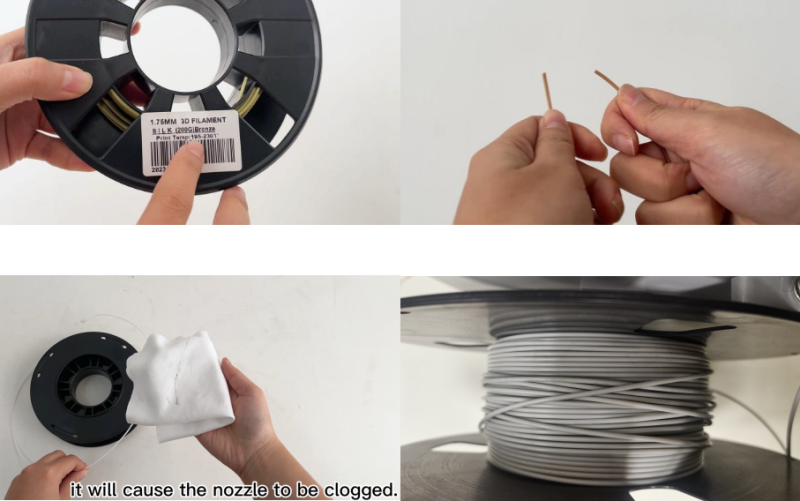
If the filament is wet, brittle, or dusty, please do not use it. If the filament is tangled, please sort it out.
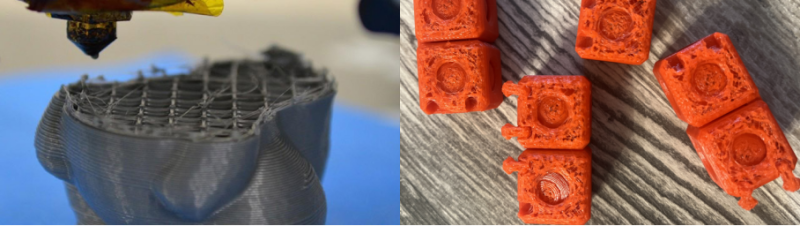
If the filament printing temperature is too low, please increase the temperature by 15°C. You can also print the following model to determine the optimal temperature of the filament.
③ The filament is stuck in the extruder or tube
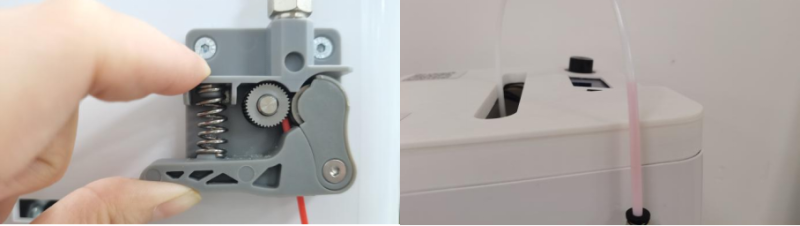
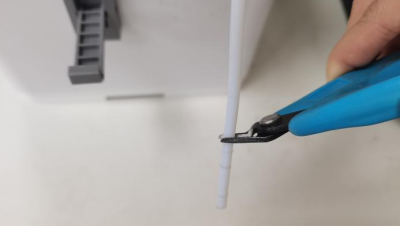
The filament is stuck in the extruder or tube: 1. Cut the filament into a bevel and insert it into the extruder. 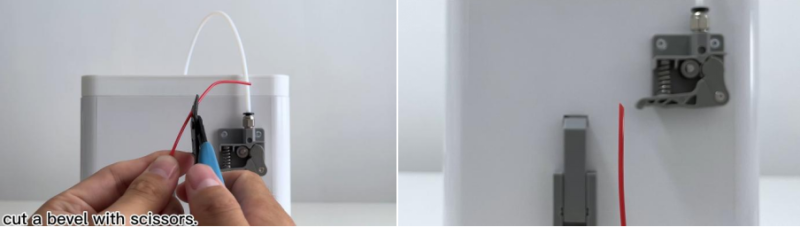
2. If there are impurities inside the tube, cut off this section of the tube.
④ Irregular operation may lead to clogging. Please clean the nozzle
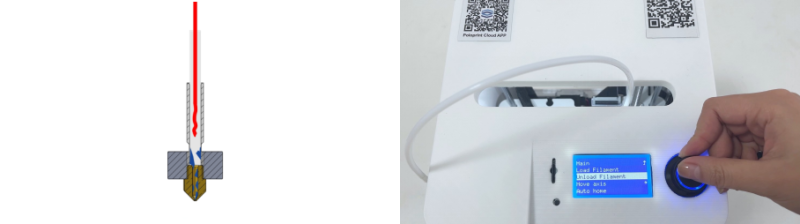
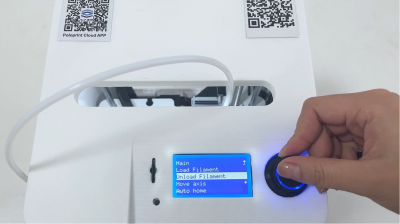
When replacing the filament, if you pull it out directly, the filament will also stick to the nozzle and tube, causing blockage. Therefore, when we replace the filament, we need to use the “Unload the filament” function.
If it is clogged, please operate accordingly and clean the nozzle:
1. “Unload the filament”.
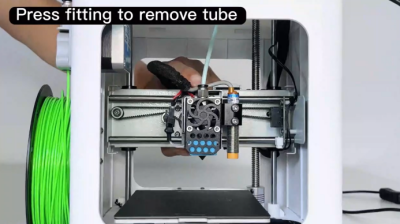
2. Press the tube fitting and remove the tube.
3. Use a 1.5mm L wrench to clear it.

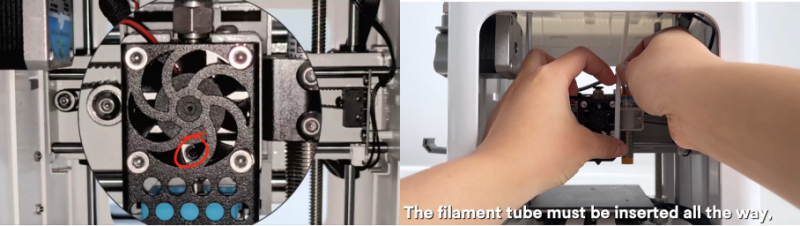
4. Insert the tube back, making sure to insert it all the way, otherwise it will be clogged again.
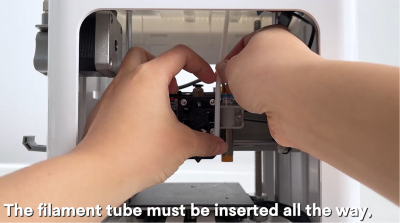
⑤ The tube is not inserted all the way
The tube must be inserted all the way, otherwise it will be blocked. 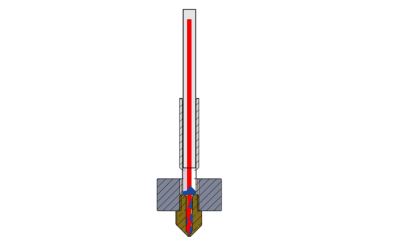
After cleaning the nozzle, be sure to insert the material tube to the end:
⑥ Seriously blocked and unable to be cleaned
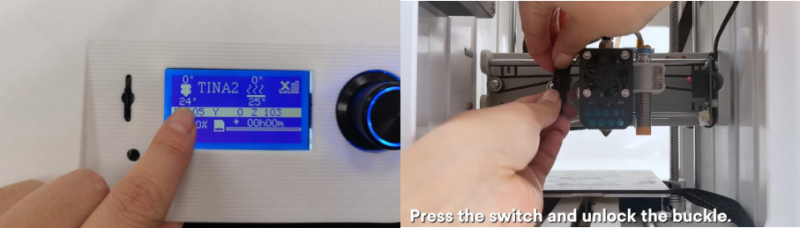
If the blockage is severe and cannot be cleaned, the hotend can be replaced:
1. “Unload the filament”.
2. Press the tube fitting and remove the tube.
3. Press and hold the switch and unlock the buckle (be careful not to get burned! Wait until the temperature is low before operating!)
4. Use a 2.0mmL wrench to loosen the screw.
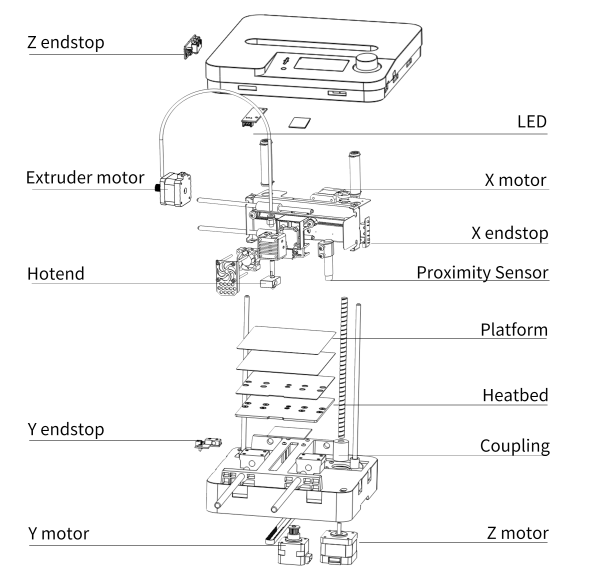
5. Replace and install a new hotend. The heat break of the hotend is inserted into the hole of the aluminum block and pushed to the top. 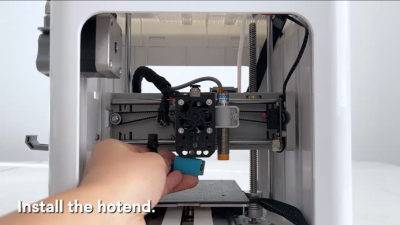
6. Fasten the buckle.
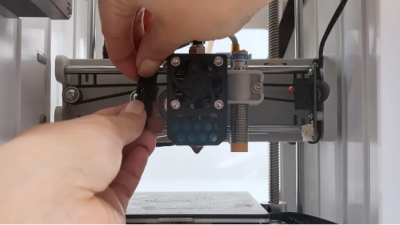
7. Tighten the screw and insert the tube to the bottom.
8. It is necessary to adjust the Z-offset after replacing the nozzle.

The Spaghetti / messed up / not sticky
If the model does not stick to the platform, it will print out of order.
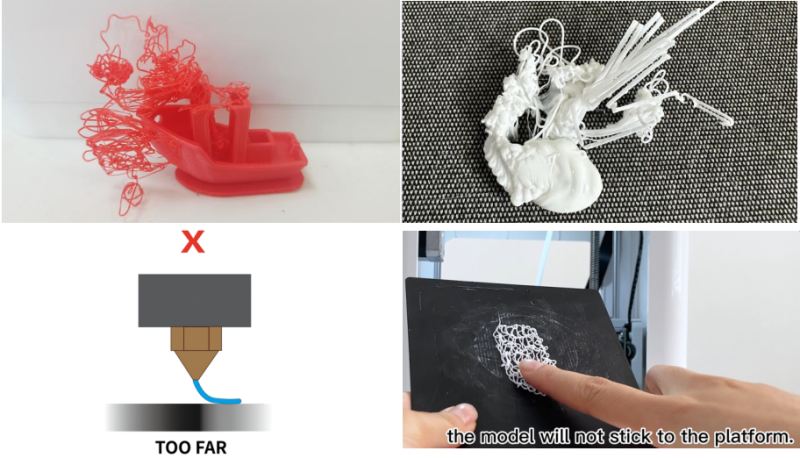
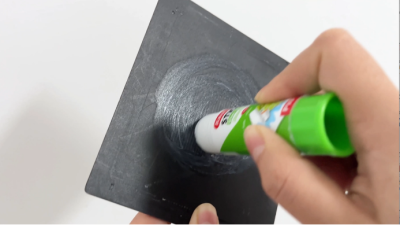
① Adhesion / First Layer Adhesion
Low temperature or long-term use will cause the adhesion of the platform to decrease. Please apply glue on the platform.
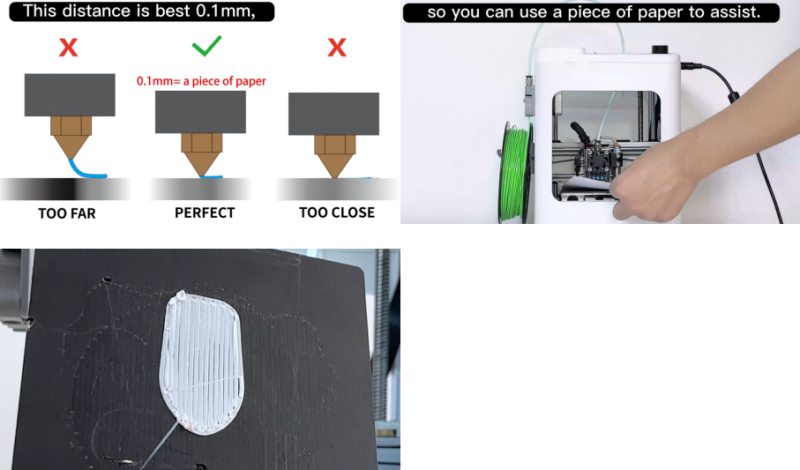
②Z-offset is too large
1.Select “Probe Z-offset”function.
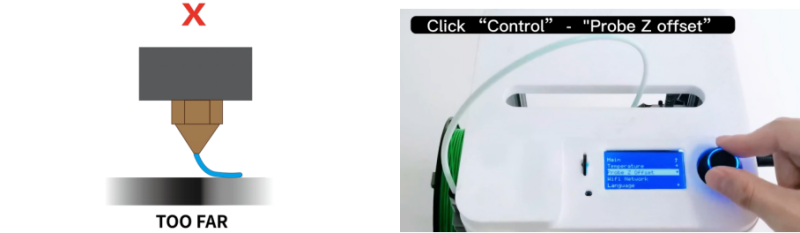
2. Adjust the appropriate Z-offset. The lines on the first layer are smooth and flat.
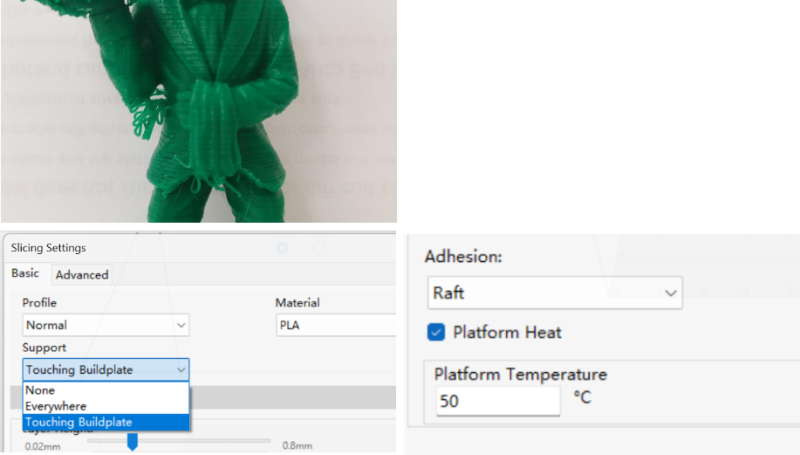
③ Support
Some models need to add supports. Without supports, they cannot be printed successfully.
Restart, blue screen
The device keeps restarting, blue screen or black screen.
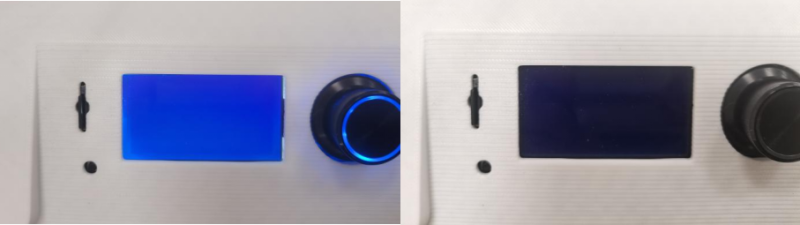
① Power supply
The power adapter or power switch is damaged, please replace the power supply.
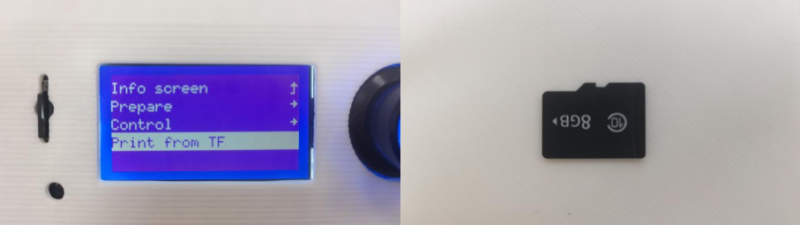
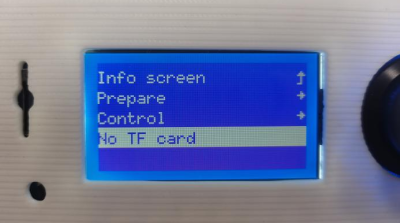
② TF card
If it keeps restarting when selecting files to print, the TF card is faulty. Please replace the TF card.
The proximity sensor fails to measure the point / damage the platform
① Z-offset is too small
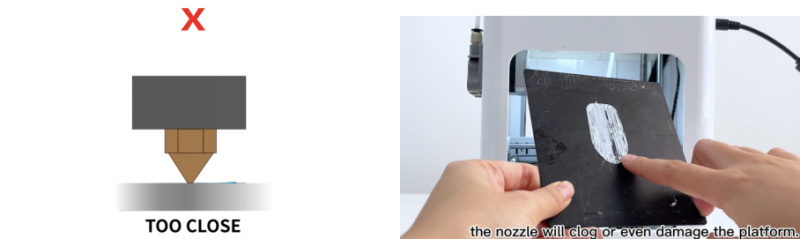
1.Select “Probe Z-offset”function.
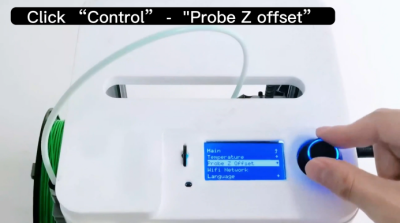
2. Adjust the appropriate Z-offset. The lines on the first layer are smooth and flat.
②The proximity sensor position is too high
1. Use a 2.5mmL wrench to loosen the screw.
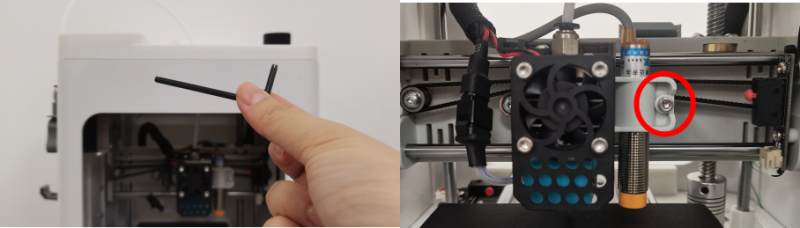
2. Adjust the approach height and tighten the screw. 
3. Z-offset is required after installation.
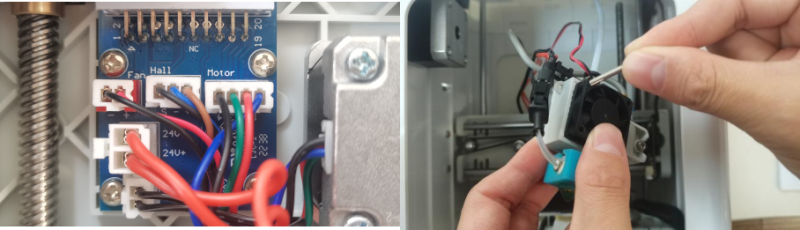
③ The proximity sensor is damaged
1. Use a 2.5mmL wrench to loosen the screw.
2. Cut off the ties and untie the black wrapping cloth.
3. Unplug the plug and remove the proximity sensor.
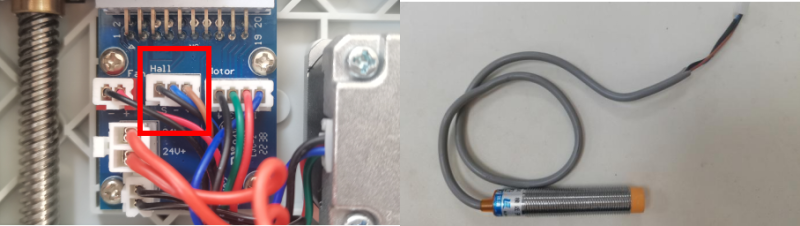
4. Replace and install a new proximity sensor and adjust the Z-offset.
Nozzle heating failure
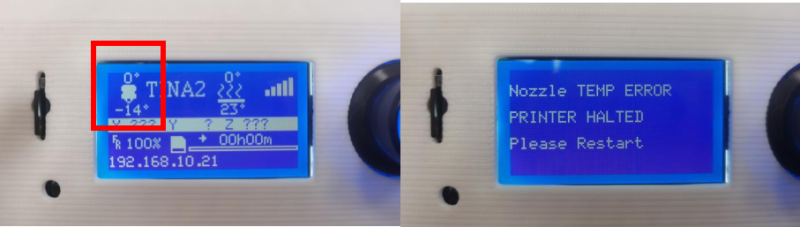 1. “Unload the filament”.
2. Press the tube fitting and remove the tube.
3. Press and hold the switch and unlock the buckle (be careful not to get burned! Wait until the temperature is low before operating!)
4. Use a 2.0mmL wrench to loosen the screw.
5. Replace and install a new hotend. The heat break of the hotend is inserted into the hole of the aluminum block and pushed to the top.
6. Fasten the buckle.
7. Tighten the screw and insert the tube to the bottom.
8. It is necessary to adjust the Z-offset after replacing the nozzle.
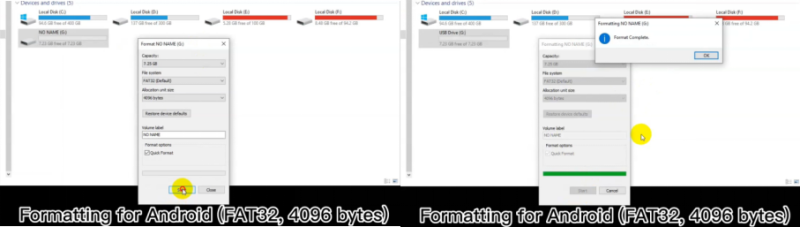
TF card is damaged
The device or computer cannot recognize it, please format the TF card.
Windows:
1. Right-click the TF card and select Format.
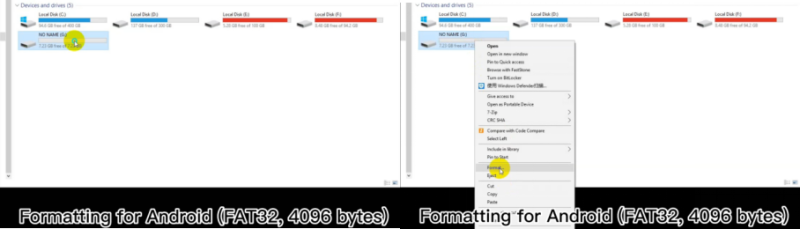 2. Click “Start” and wait for the formatting to complete. If the problem is not solved, please replace it with a new TF card.
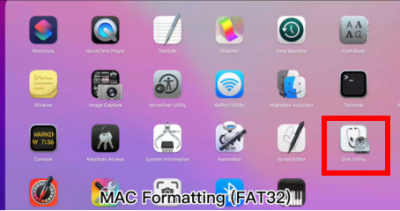
Macos:
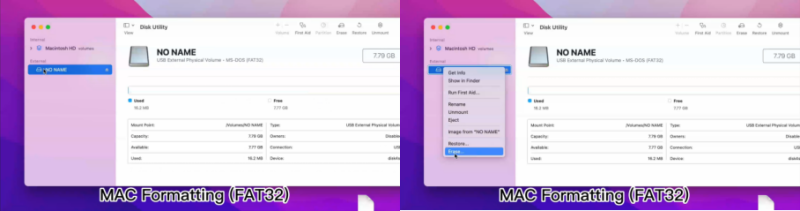
1. Open “Disk Utility”
 2. Select the TF card, right-click and select “Erase”
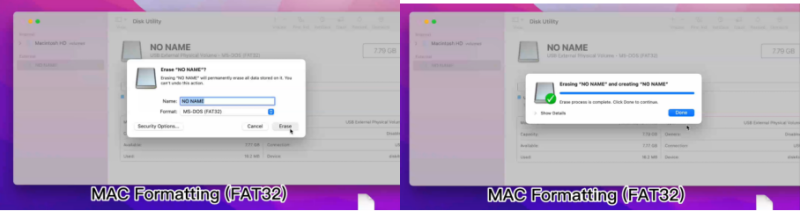
 3. Click “Erase” and wait for the formatting to complete. If the problem is not solved, please replace it with a new TF card.
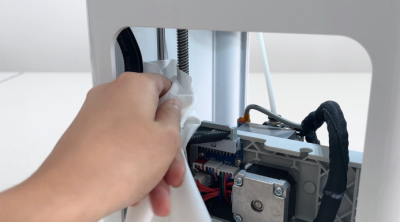
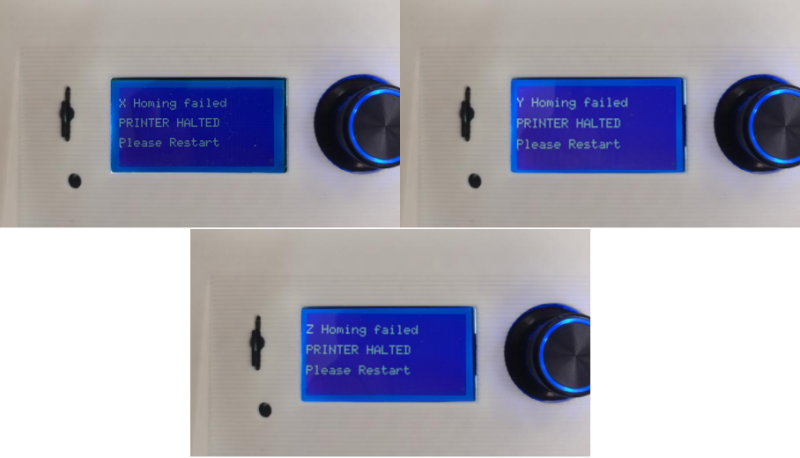
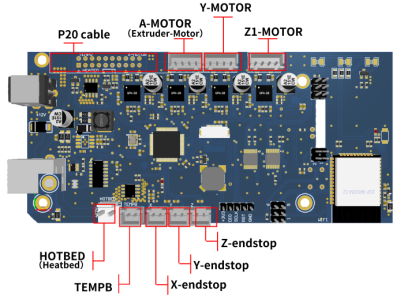
Homing failed, the nozzle kept bumping
 Please enter endstop troubleshooting
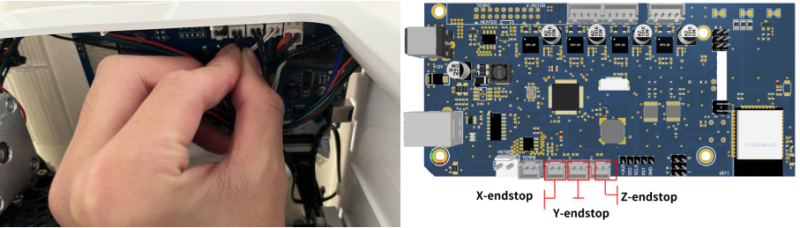
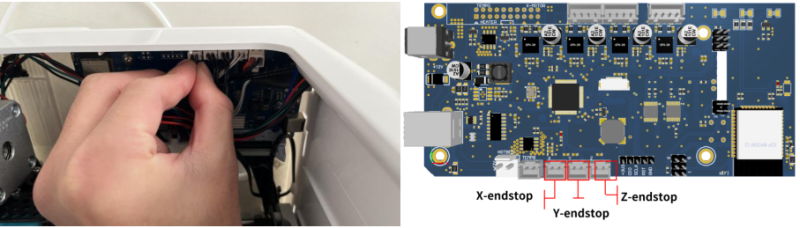
1.Open “endstop”
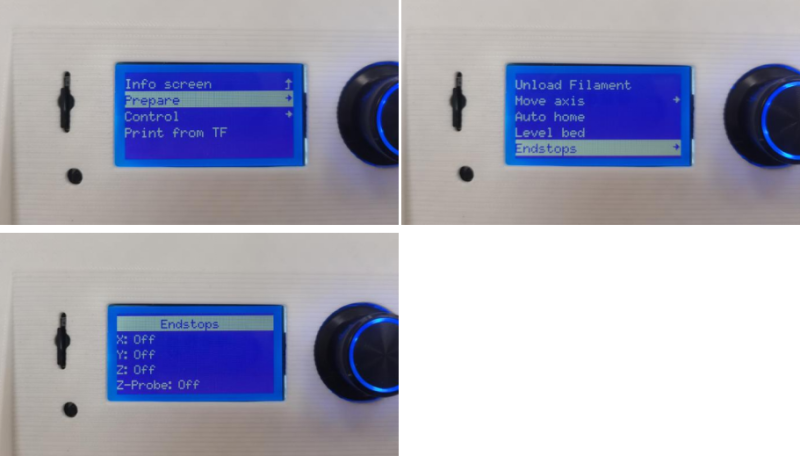
2. Click the X, Y, and Z endstop with your hand to observe whether “Off-On” is displayed normally. If it is not displayed normally, it is a fault.
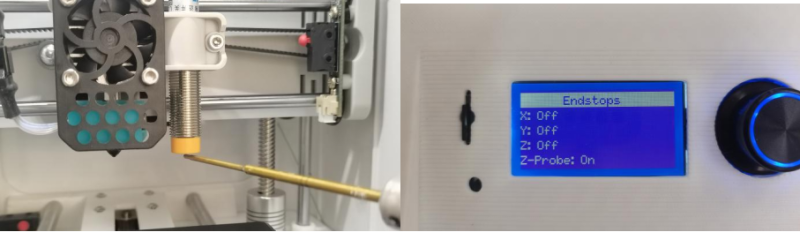
3. Place a metal wrench under the proximity sensor and observe whether “Off-On” is displayed normally. If it is not displayed normally, it is a fault.
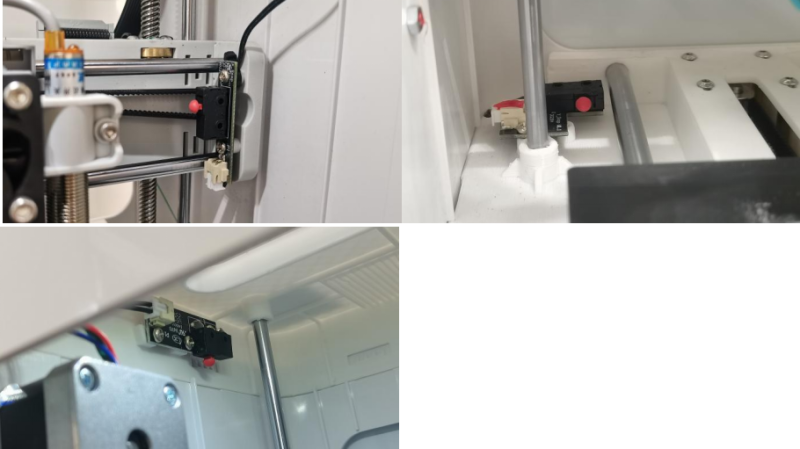
① X homing failed
1. Re-insert the plug to see if it works properly.

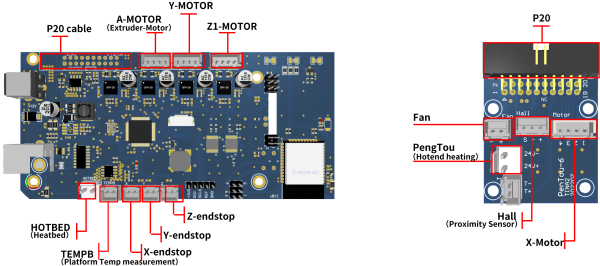
2. Unplug the X endstop wire on the motherboard.
3. Cut off the black ties.
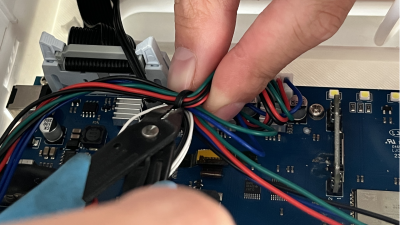
4. Use a screwdriver to loosen the screws on the X endstop and replace it.
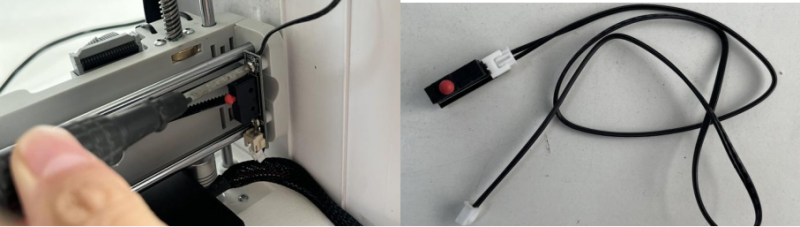
② Y homing failed
1. Re-insert the plug to see if it works properly.
2. Unplug the Y endstop wire on the motherboard.
3. Cut off the black ties.
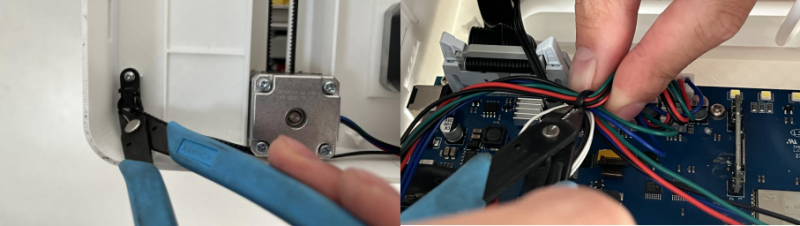
4. Use a screwdriver to loosen the screws on the Y endstop and replace it.
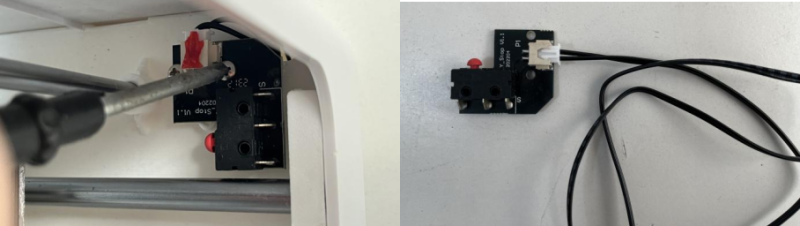
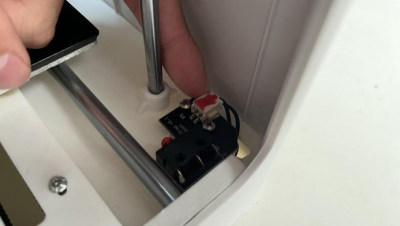
③ Z homing failed
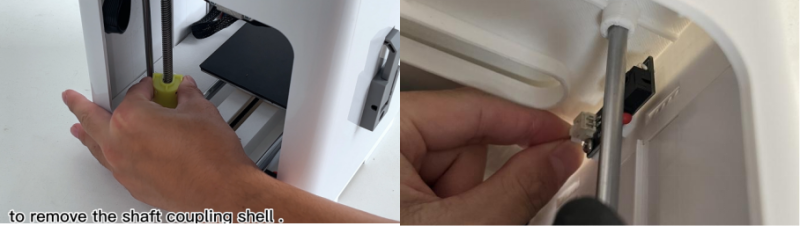
1. Confirm that the shaft coupling shell has been removed, re-insert the plug to see if it works normally.
2. Unplug the Z endstop wire on the motherboard.
3. Cut off the black ties.
4. Use a screwdriver to loosen the screws on the Z endstop and replace it.

③ The proximity sensor is damaged
1. Use a 2.5mmL wrench to loosen the screw.
2. Cut off the ties and untie the black wrapping cloth.
3. Unplug the plug and remove the proximity sensor.
4. Replace and install a new proximity sensor and adjust the Z-offset.
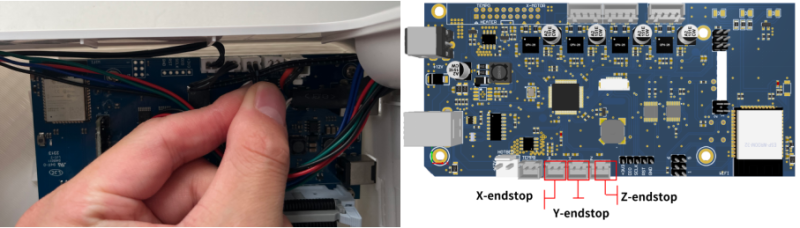
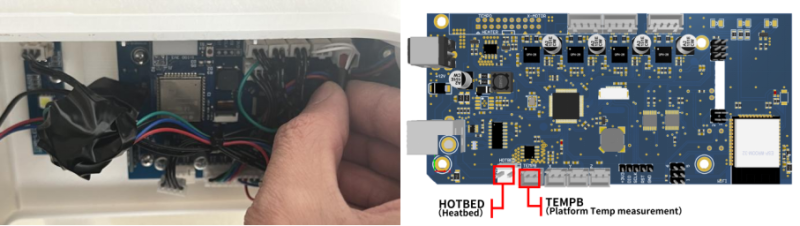
Mainboard failure, or knob failure
If there is a blue screen or the knob does not work, it means the motherboard is faulty and needs to be replaced.
1. Use a screwdriver to loosen the screws on the motherboard.
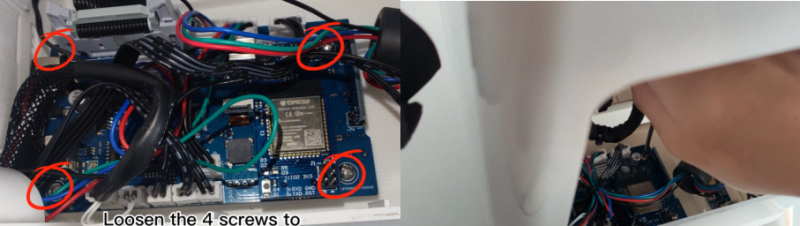
2. Unplug all the cables on the motherboard and replace with a new one.
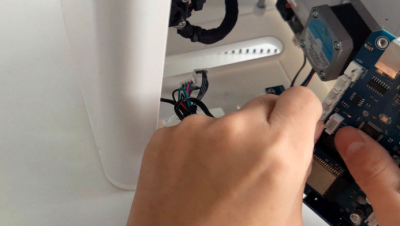
3. Plug the cables back into the motherboard and tighten the motherboard screws.
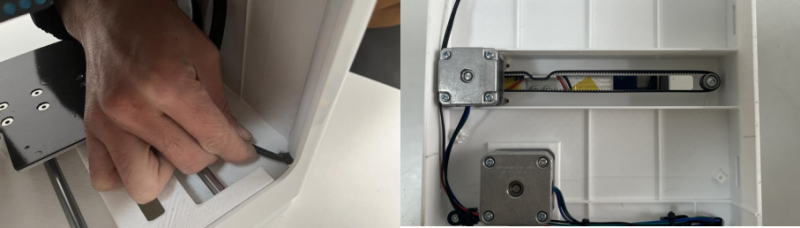
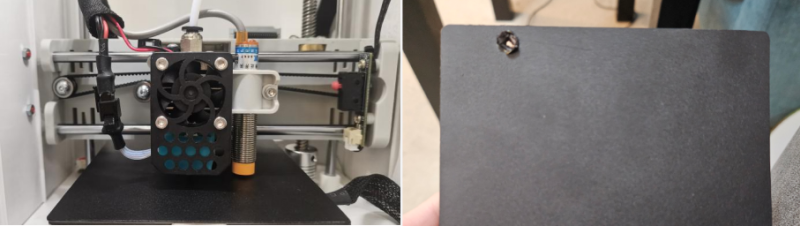
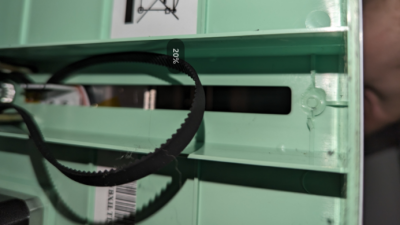
Belt and Y-axis holder
If the belt falls off, it can be reinstalled manually.
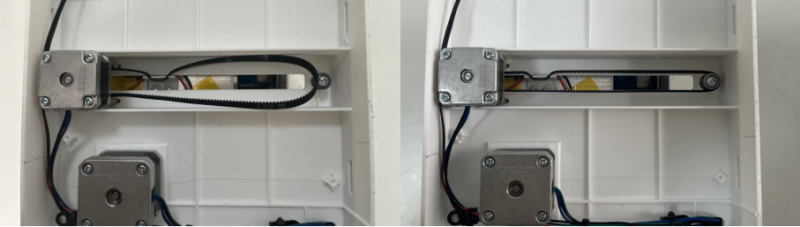
1. Use a 2.0mm wrench to loosen the 4 platform screws.
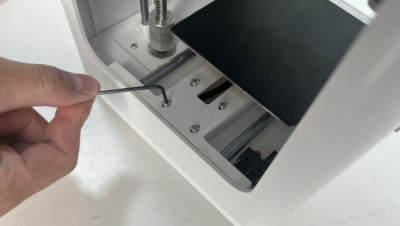
2. Break the belt back to its original position.
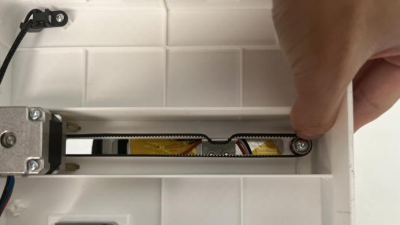
3. Press the motor firmly with your hand and tighten the 4 screws.
4. If the Y-axis holder is broken, it cannot be repaired. Please contact after-sales service.
Platform heating failed
1. Use 2.0mm and 2.5mm wrenches to loosen 10 heatbed screws.
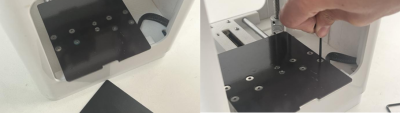
2. Cut off the black ties.
3. Unplug the heatbed cables.
4. Remove the heatbed and replace it with a new one.
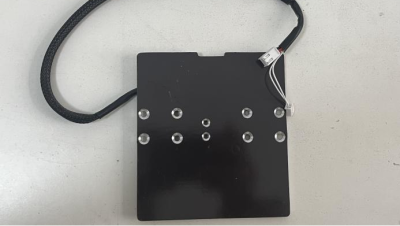
5. Install the new heatbed and check whether the belt has fallen off. If it falls off, manually buckle the belt onto the holder.